In our ongoing Back to Basics series, we have and will continue to reintroduce foundational sewing techniques and vocabulary. Today we will discuss one of the most common yet unnerving words in the sewing dictionary: bias. What is bias? And how can it change your entire garment making experience?
Bias vs. True Bias vs. Other
First, let us define the exact meaning of bias, along with other terminology which will further support a proper understanding of it.

- Bias – any directional/diagonal grainline of the fabric
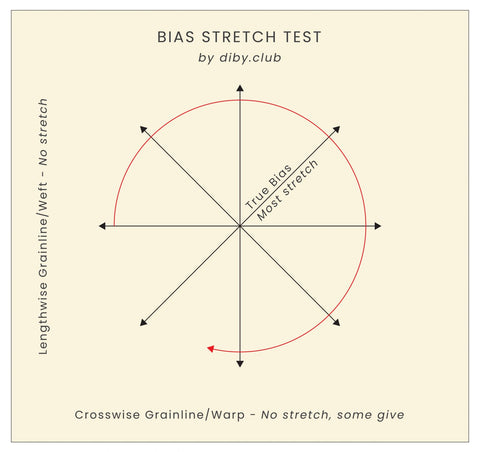
- True Bias – bias cut at a 45 degree angle to the selvage. Generally speaking, pattern instructions which dictate “bias” are referring to the true bias. True bias holds the maximum amount of directional stretch within woven material.
- Selvage: the “self-finished edge” of fabric after it is run through the mill to prevent it from unraveling.
- Grainline – direction of the running thread in relation to the selvage. Within each piece of material there are two grainlines: crosswise and lengthwise.
- Lengthwise Grainline – also known as the weft. This grain refers to threads running parallel to the selvage and has no stretch. This is the grainline referred to in pattern instructions.
- Crosswise Grainline – also known as the warp. This grain refers to threads running perpendicular to the selvage and has no stretch but might provide some “give”.
Why is Bias Important?
Proper understanding of bias is represented in the final product. A garment with proper bias is flattering on the form, with a lovely drape cascading delicately from the wearers body. On the other hand, a garment without proper bias use may be warped on the outlook, impossible to get on, or a challenge to construct in the first place.
Bias in Action
The most important characteristic of the bias is in the way it makes fabric behave. As mentioned earlier, fabric cut on the bias has much more flexibility making it ideal for woven form fitting garments further charmed by a delicate drape and silhouette effect. Examples of such garments include: lingerie, vintage evening and slip dresses and even our very own Butterfly Bias Dress as seen here.

Another, more common use among at home sewists is bias tape. Due to its maximum stretch, bias is useful in pieces requiring more give such as neck and sleeve binding, drawstrings, or straps. In quilting, bias tape is used to finish the raw edges of quilts or as piping around pillow edges.

How To Find The True Bias
There are a several ways to determine a true bias. Here are a few of our recommendations.
Use A Right Angle Ruler
As mentioned before, the true bias runs exactly 45 degrees between the cross and lengthwise grains. Use your ruler to square off the two grainlines. From your corner, using a fabric marker, draw two marks: 6 inches up the raw edge and 6 inches along the selvedge. Use your ruler to connect the two marks. That is the direction of the true bias.

Use Your Pattern
When trying to determine the bias for a pattern, pay attention to the symbols indicated directly on the pattern piece. All professional patterns will include arrows indicating the grainline. Again, these grainlines are referencing the lengthwise grainline. Arrange the pattern so it matches that of your fabric grainline and your bias will naturally fall into place.

Stretch Test
This last test can not guarantee a true 45 degree bias but will still help you find a general bias in a pinch. If your finished edges have been trimmed off you can determine the bias by exploring the stretch. Remember, the cross grain will have some give, length grain will have no stretch and the bias will be the most flexible of the three grains.
Begin by using two fingers to stretch the fabric in opposing directions. Slowly work around in a clockwise manner, continuing to stretch the fabric in opposing directions taking note of the nature of your stretch. Once you’ve determined the grain and bias, draw arrows with a fabric marker for reference.

How To Cut On The Bias
If you are using pattern pieces it is simply a matter of using one of the above methods to first find the bias then match the grainline on your pattern with the grainline on your fabric.
However if you are trying to make strips of bias tape the process has a few more steps but is no less complicated.
Prep Your Fabric
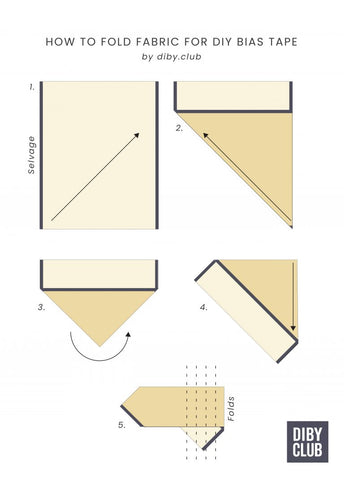
- Make sure all your fabric has been properly washed and dried. Open your fabric piece. Taking two diagonally opposite edges in hand raise and stretch them apart. Repeat with the other two edges. This will straighten out your grain for proper alignment and cut.

Folding
- Lay your fabric open so that your selvages are on your left and right edges. This means your top and bottom edges will be raw.
- Pick up your bottom left corner and fold over to match the bottom edge to the right selvage. This will create an upside down right triangle.
- Repeat with the bottom right corner, bringing it to touch the top left corner of the triangle. Now your triangle is pointing towards you.
- Turn your piece to the right till your triangle is a right angle again.
- Fold your top edge over bringing the top right corner to touch the bottom right corner of the triangle.
Cut
- All your folds will now be along your right edge. Using your rotary cutter, trim all the folds away so your piece sits flat.
- Now you can begin cutting strips to the width you would like. If you don’t want to cut the whole thing, fold it up neatly, keeping your original folding intact and then store it away for your next binding needs.
Be Biased
This was just a brief introduction of bias but we hope it encouraged you to take the leap into further exploration. Bias sewing can seem complicated when you first start out and we’d be lying if we said we hadn’t had our fair share of rough learning experiences. However we believe that with the right inspiration, information and support there’s nothing you can’t master.
Originally Authored by Veronica Burnham. Archived by Kathryn Graham.
